This Beginner’s Guide will provide you the knowledge and understanding of what you need to thoroughly take advantage of WhatsGenius WhatsApp CRM and in turn improve communications with your customers to facilitate growth for the business. We will look at a wide range of features such as automated workflows, personalized messaging, team collaboration tools, illustrative analytics, and we will show you how you can use these features to maximize your investment.
WhatsApp has squarely established itself as the go-to communication tool for business. If it is going to be relied on so heavily, there is going to need to be some kind of proper way to manage customer interactions and overall workflow. Having a WhatsApp CRM, such as WhatsGenius, is a very effective way to manage customer interaction using WhatsApp.
How to set up your WhatsGenius CRM –
Before we get into the excitement of the features of WhatsGenius CRM and how this added communication with your customers will improve your business, we need to get your account set up.
1. Installing the extension:
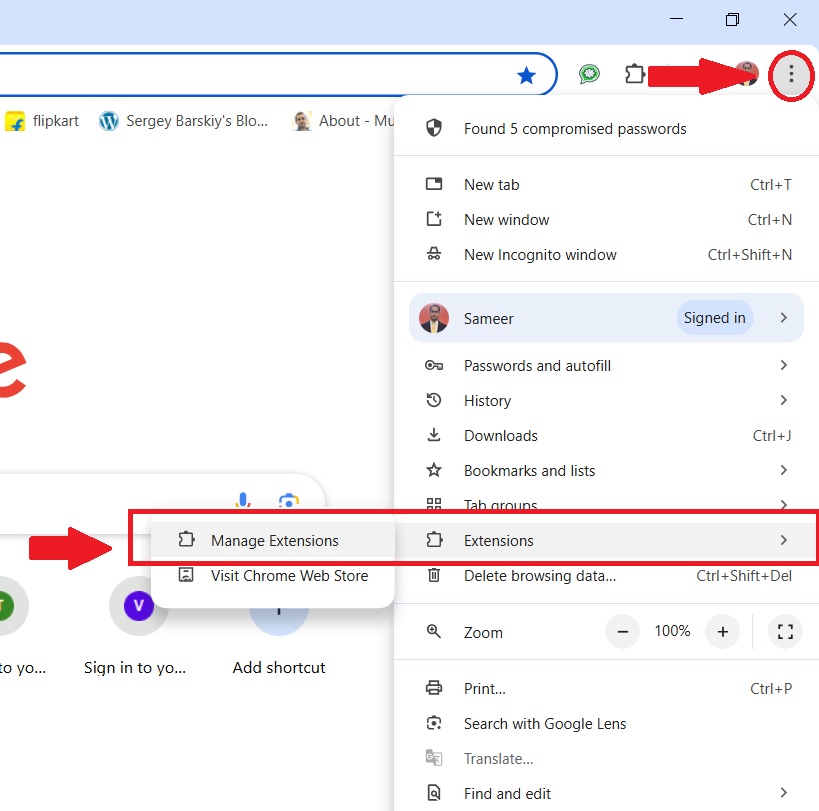
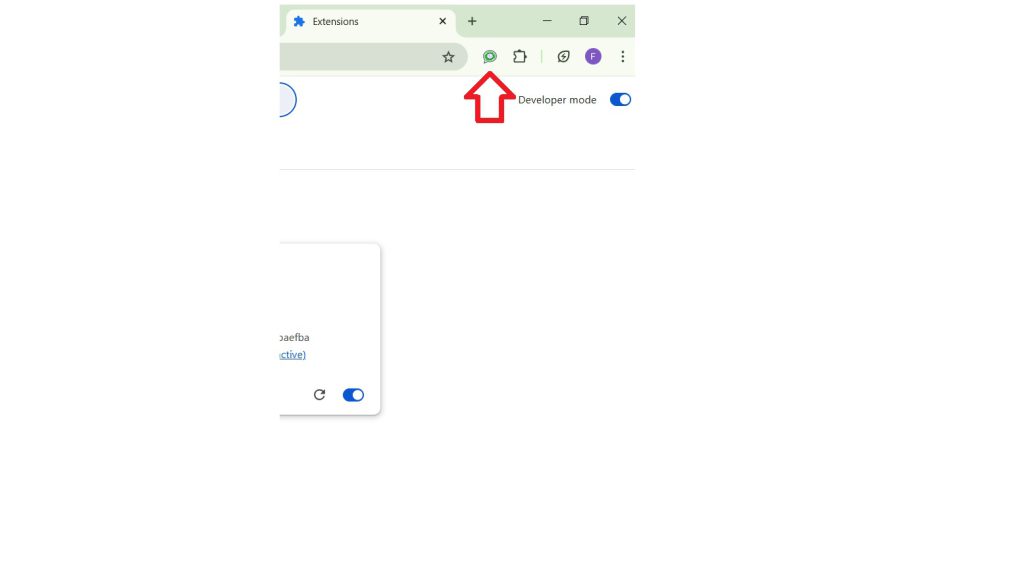
- In a Google Chrome based web browser navigate to chrome://extension. Search for “WhatsGenius CRM” and click “add” it to add to your chrome browsing extension.
- Note: If you struggle with the installation process see the full installation guide- WhatsGenius WhatsApp CRM Installation Step-by-Step Guide
2. Activating the extension:
- Once you have installed successfully, then you can click on the WhatsGenius CRM icon in the chrome tool bar.
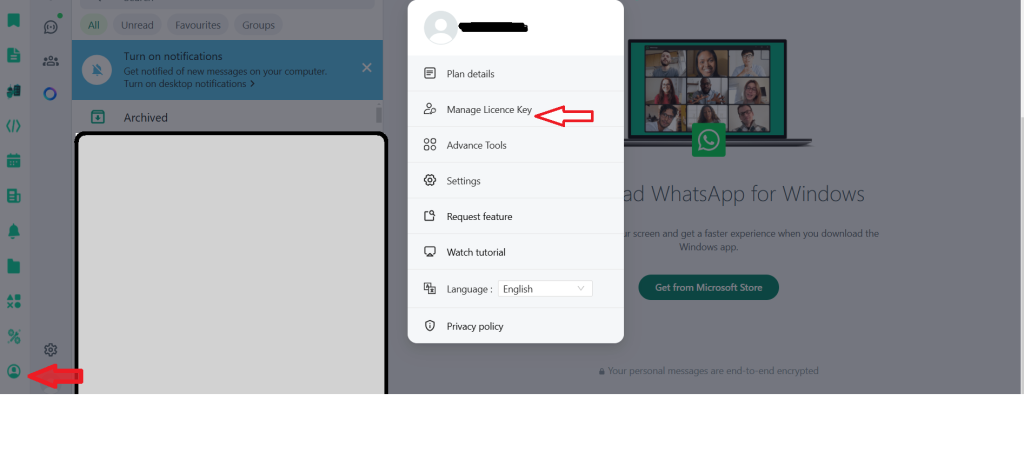
- Once you purchased WhatsGenius CRM you would have received a unique license key
- Follow the step-by-step activation guide to activate your CRM and unlock all its features.
3. Launch and Connect:
- Locate the WhatsGenius CRM extension conveniently pinned to your browser.
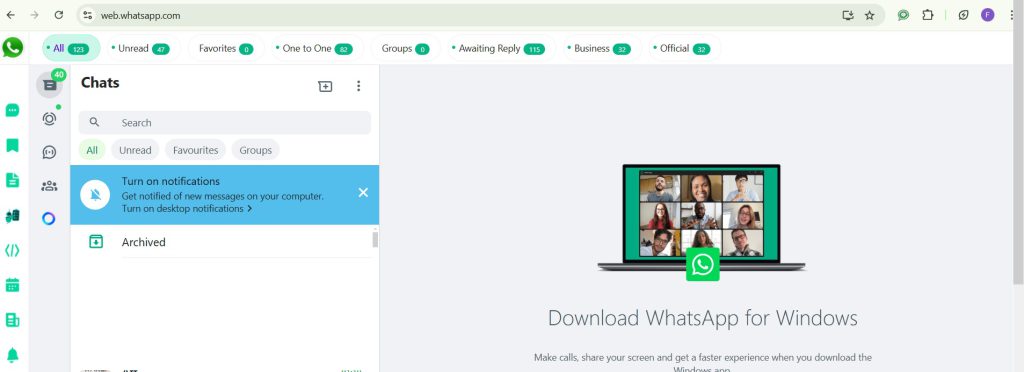
- Log in to your WhatsApp account on web.whatsapp.com. Click on the WhatsGenius CRM extension icon to launch the CRM interface.
- You’re now ready to explore the features and start managing your WhatsApp business interactions effectively.
How to Use Key Features of WhatsGenius WhatsApp CRM
Here’s a simplified guide to using some of the key features of WhatsGenius CRM.
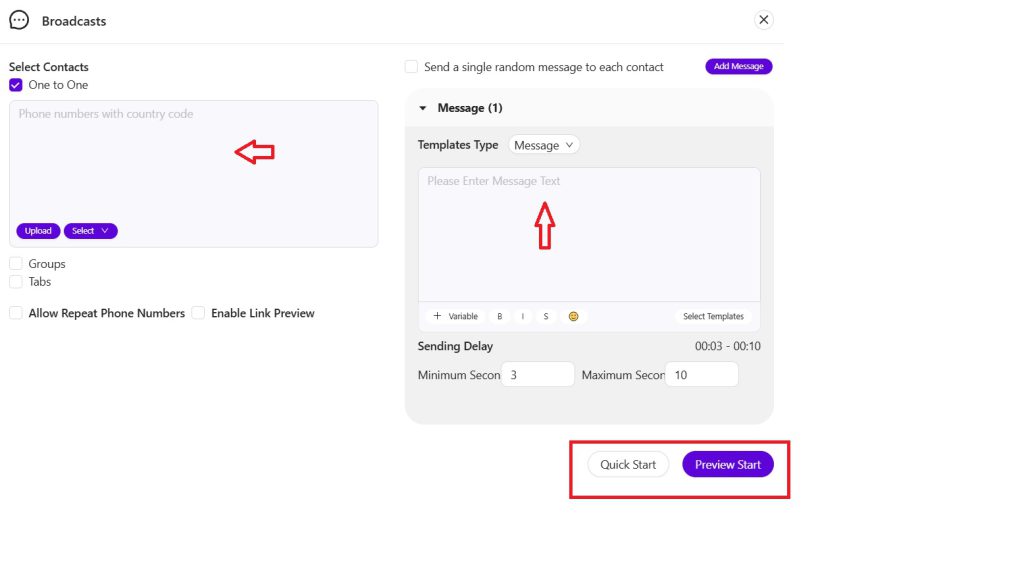
1. Flash Broadcast: Send instant messages to multiple contacts simultaneously.
- 1. Select your delivery method:
- Choose how you want to send your message:
- 1:1: Send individual messages to each contact on your list.
- Group: Send a single message to a selected group of contacts.
- Tab: Send the message as a link to a custom tab within WhatsApp.
- Compose your message:
- Write your message in a clear and concise manner.
- You can also include images, videos, documents, and audio files to enhance your message.
- Choose your recipients:
- Select the contacts or groups you want to send the message to.
- Review and send:
- Review your message and recipient list carefully before clicking “Send”.
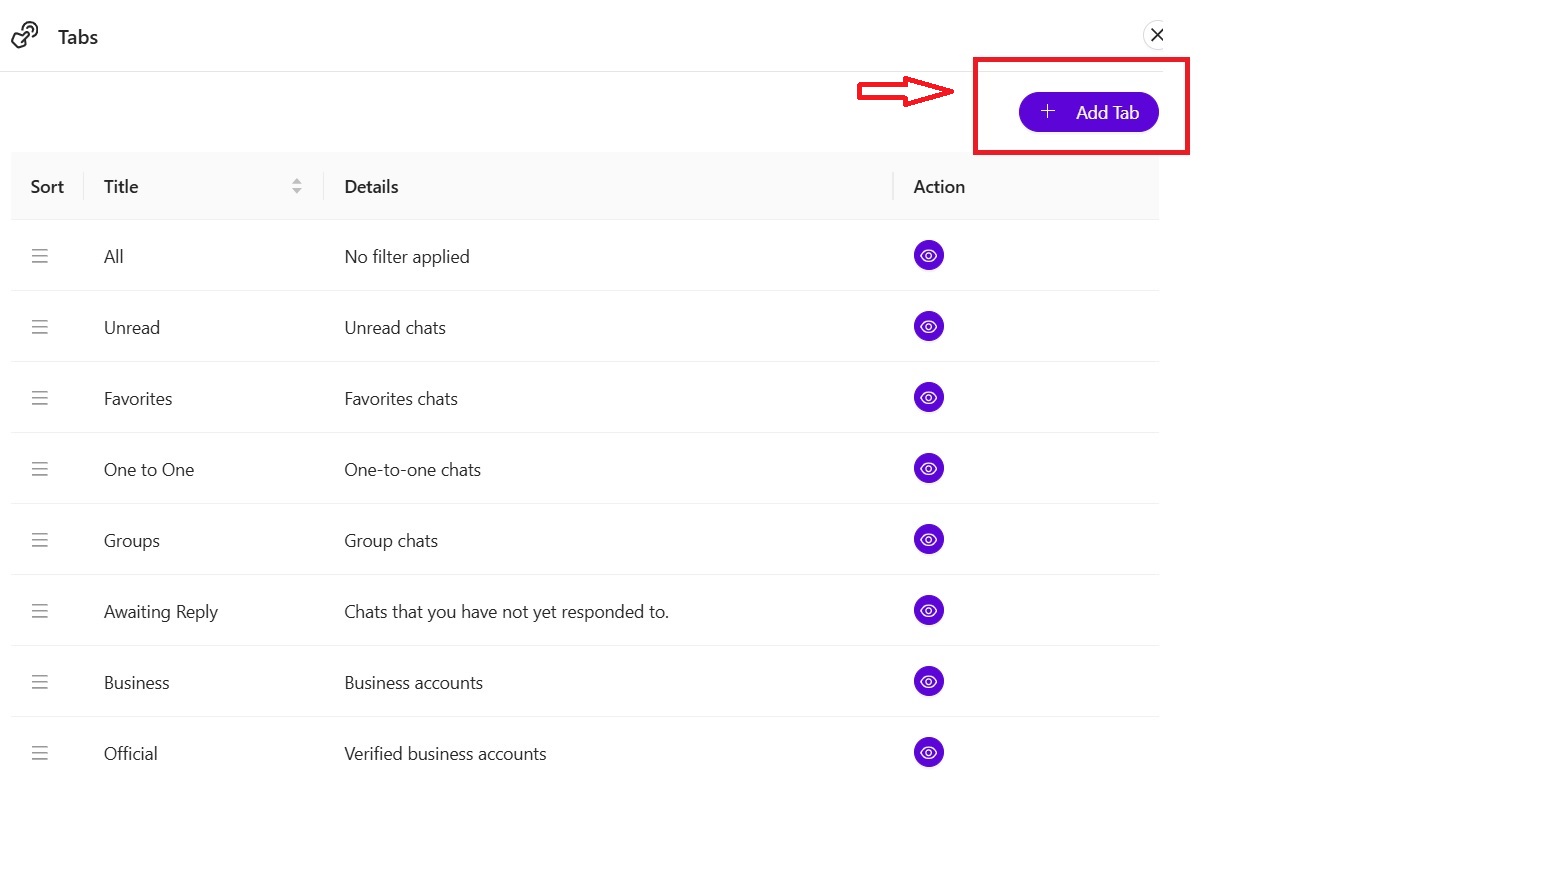
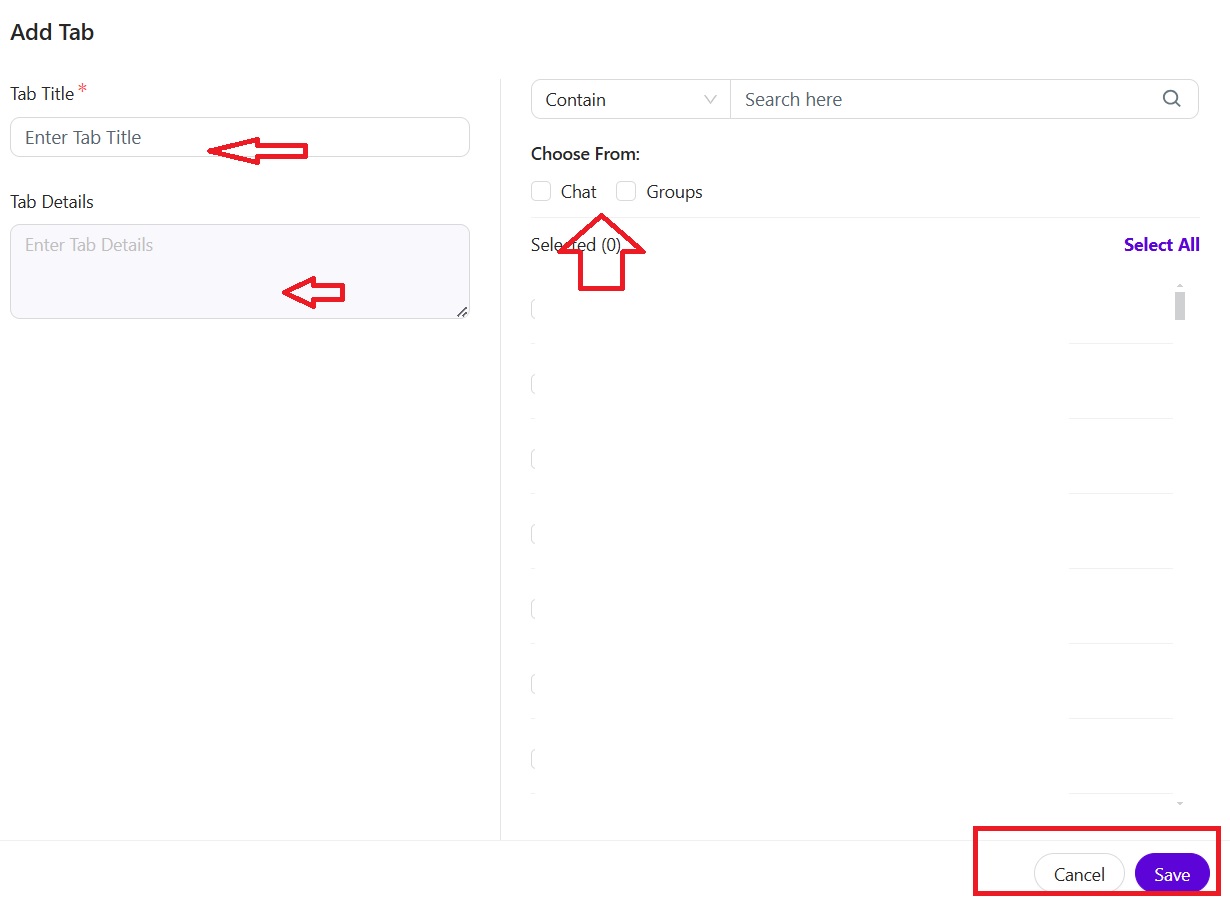
2. Custom Tabs: Create a new tab within the CRM.
- Design your Tab:
- Give your tab a descriptive name (e.g., “Product Catalog,” “FAQs,” “Order Tracking”).
- Add relevant content to your tab, such as Tab details.
- Choose your delivery method:
- Select how you want to share the tab:
- Through Chats: Share the tab link directly within individual WhatsApp conversations.
- To Groups: Share the tab link with specific WhatsApp groups.
- Select your recipients:
- Use the search bar to quickly find and select the desired contacts or groups.
- Save your tab:
- Click on the “Save” button to save your newly created tab.
- Edit or Delete:
- You can easily edit the content of your tab or delete it entirely if needed.
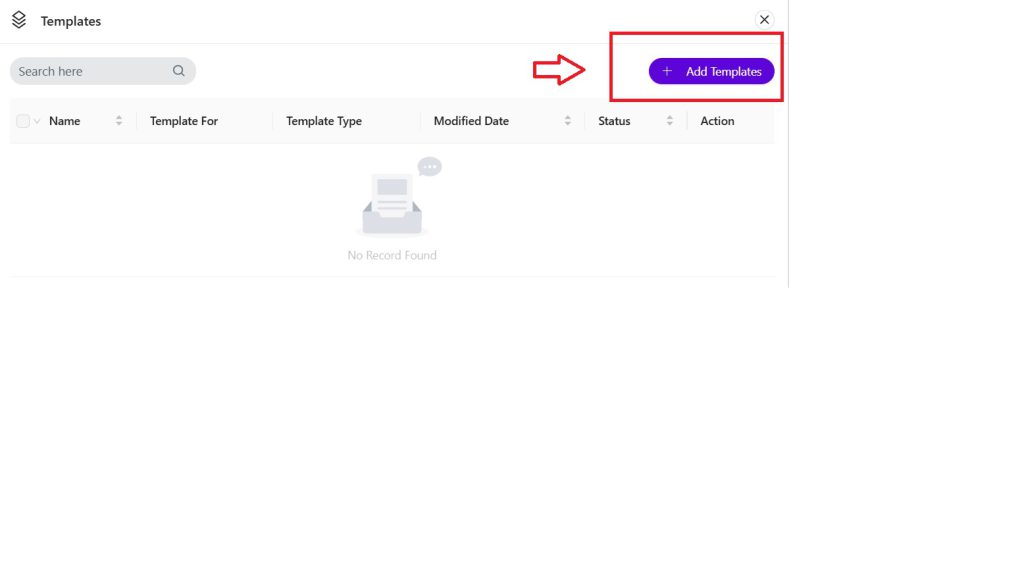
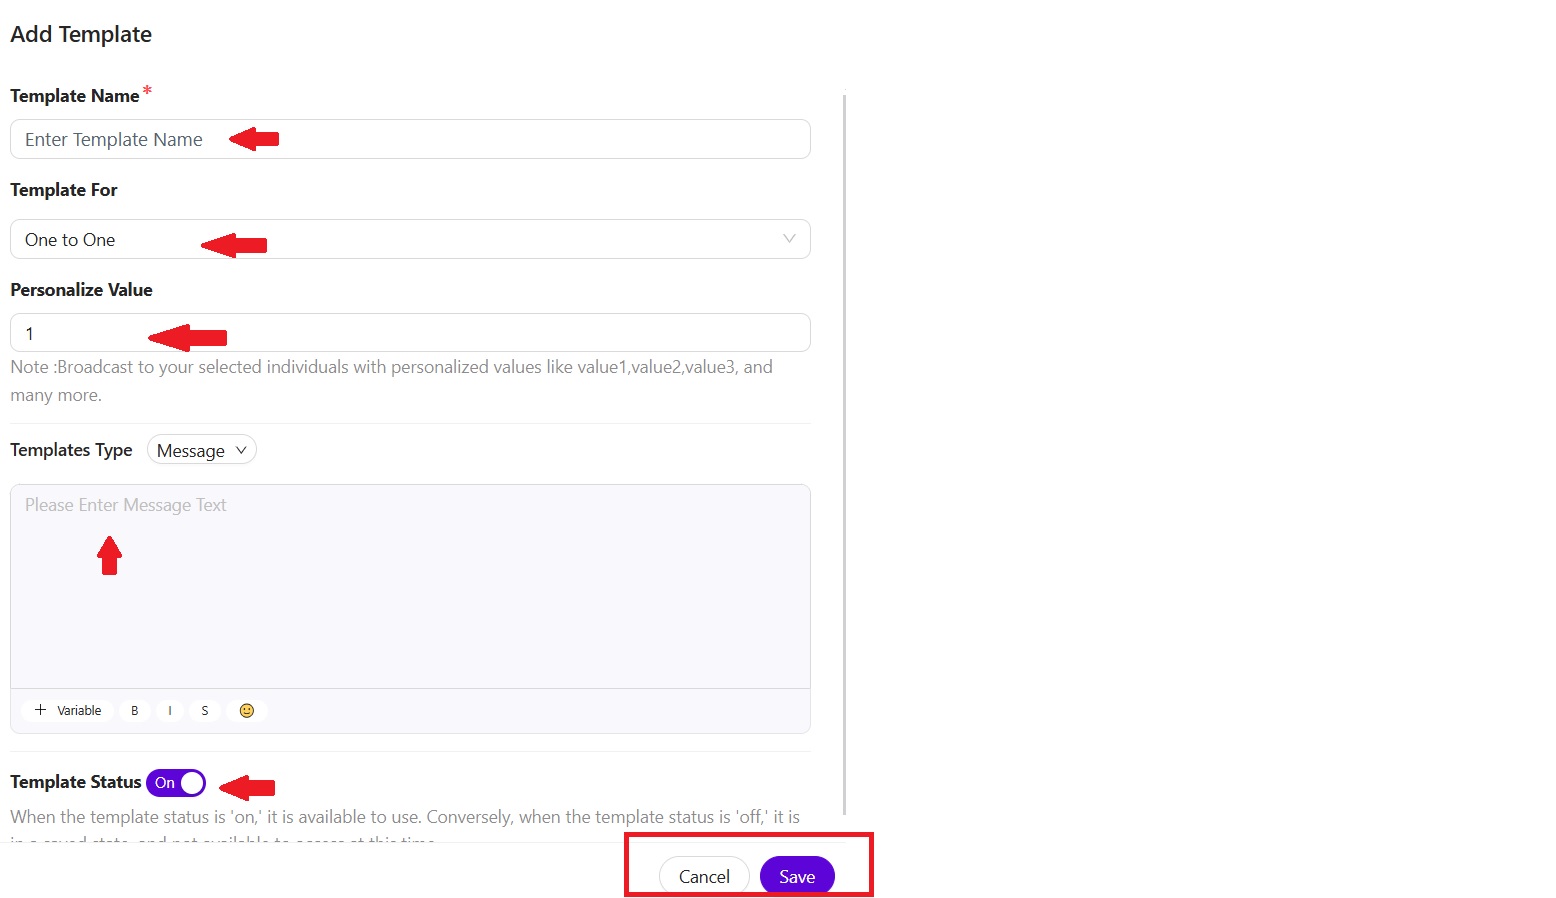
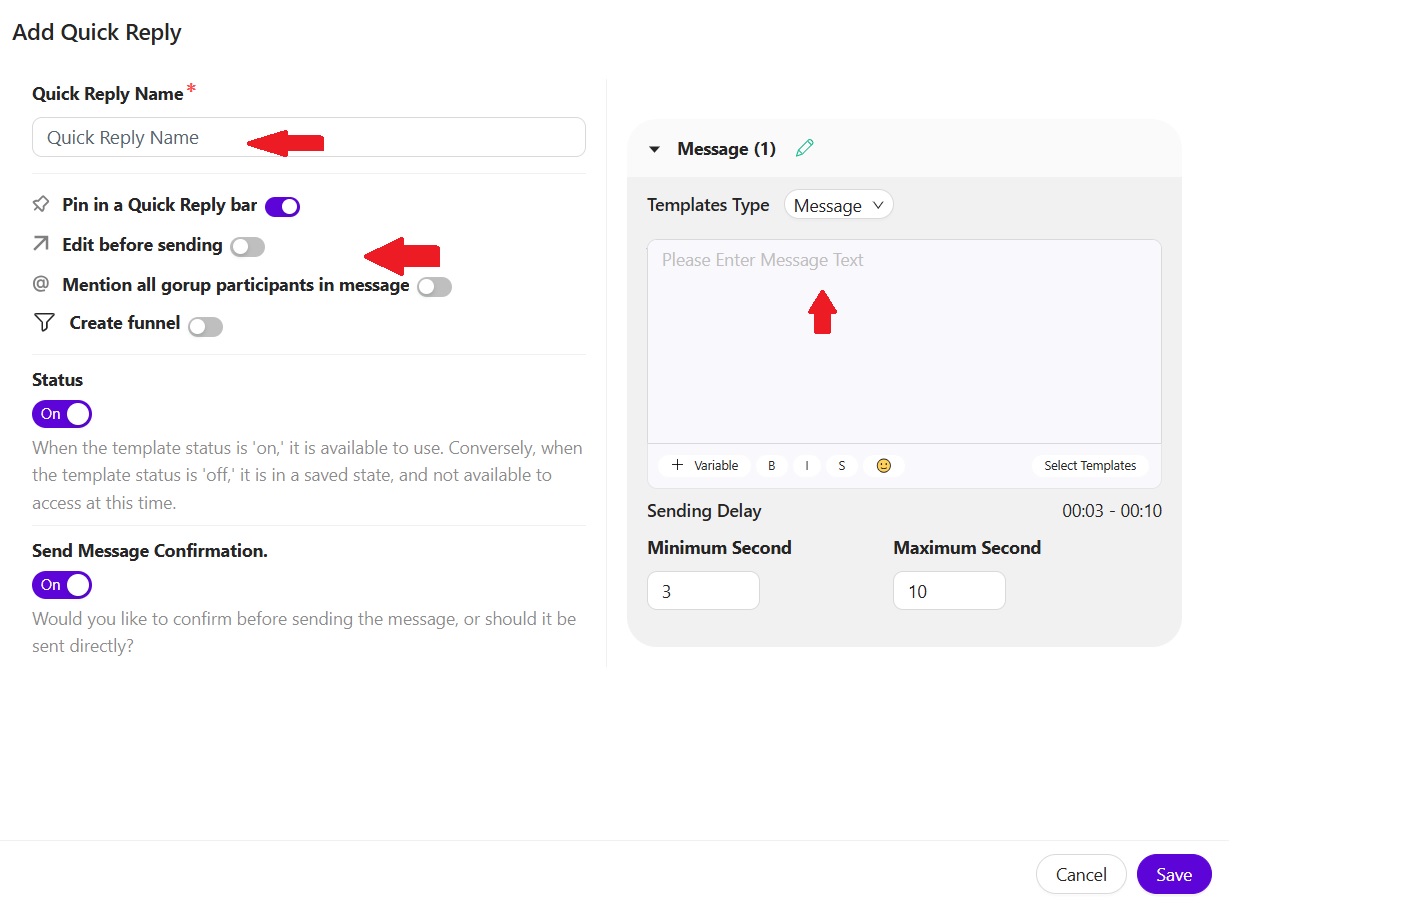
3. Templates: Create a message template with placeholders for variable information.
- Create a Template:
- Click “Create Template.”
- Enter a descriptive name for your template (e.g., “Welcome Message,” “Order Confirmation”).
- Compose your message, including placeholders (e.g., {customer_name}, {order_id}) for dynamic information.
- Save the template.
- Edit or Delete:
- Modify or remove templates as needed.
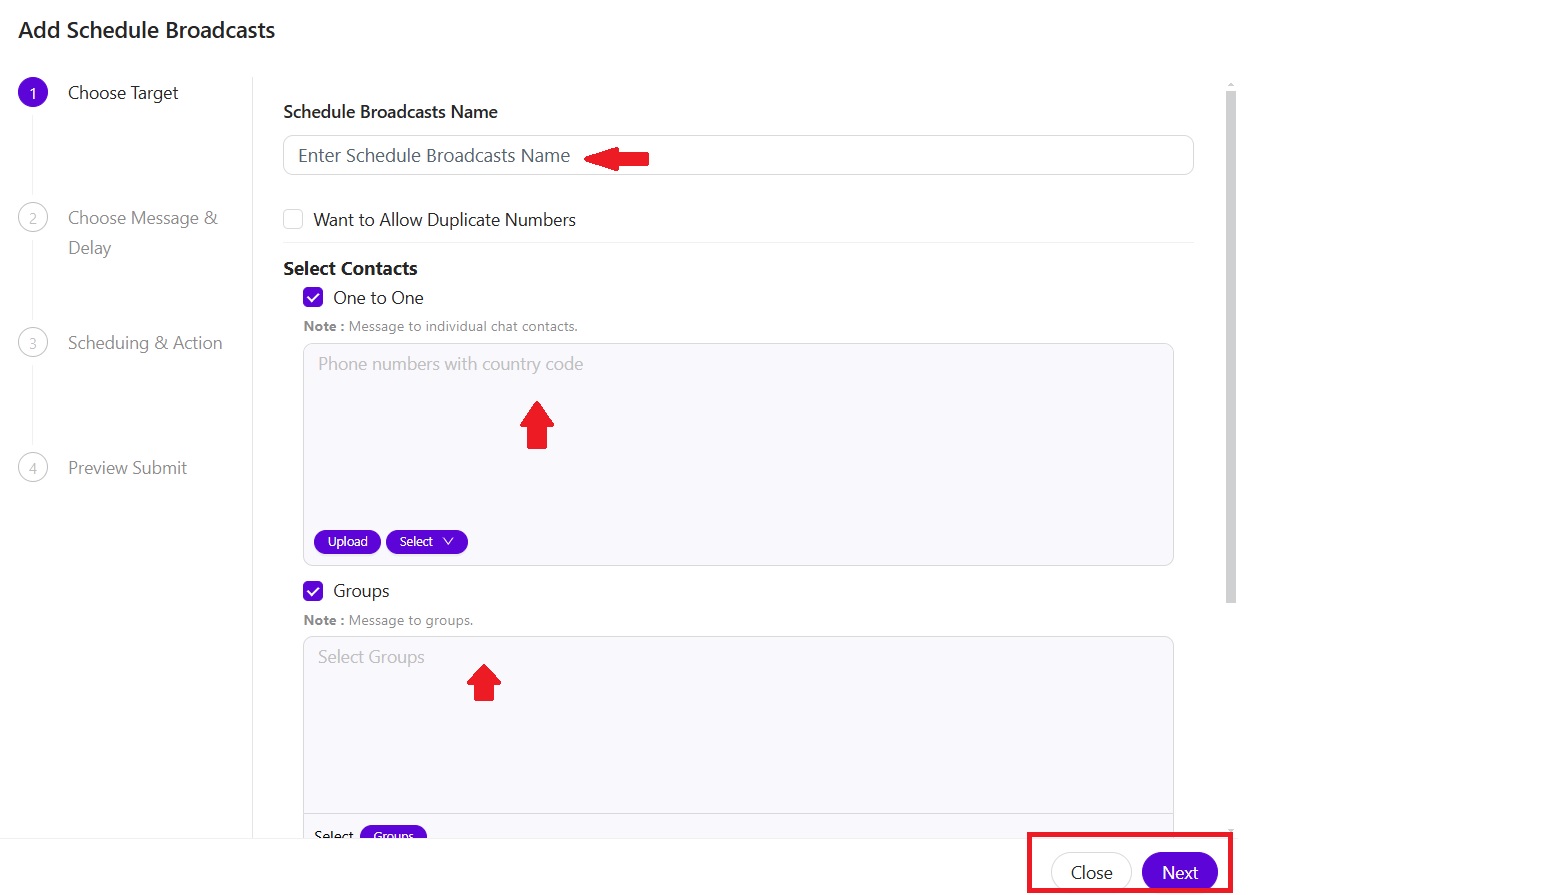
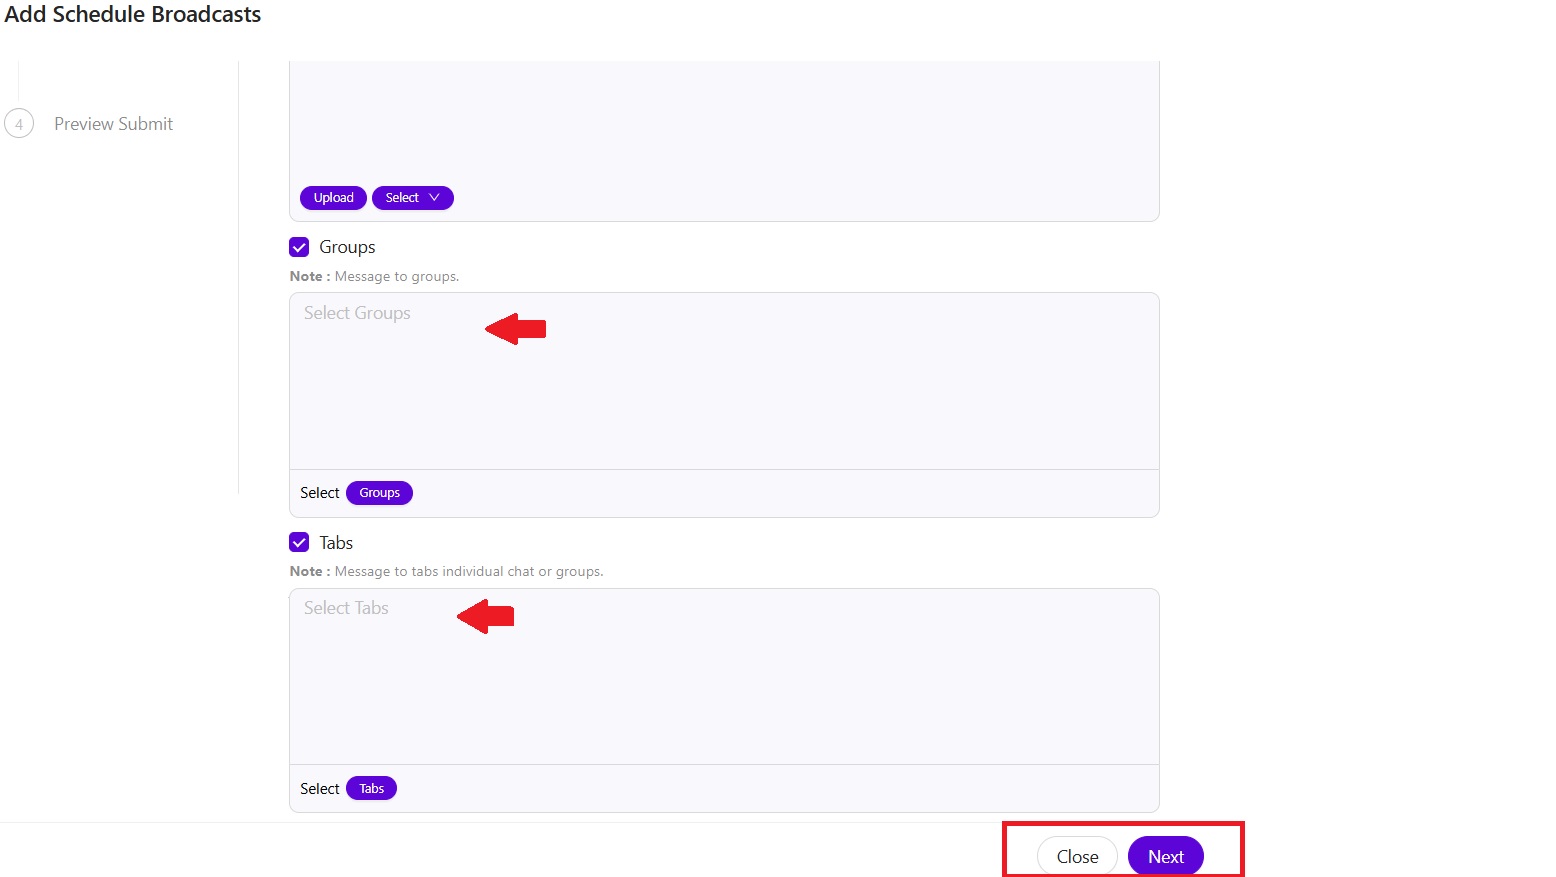
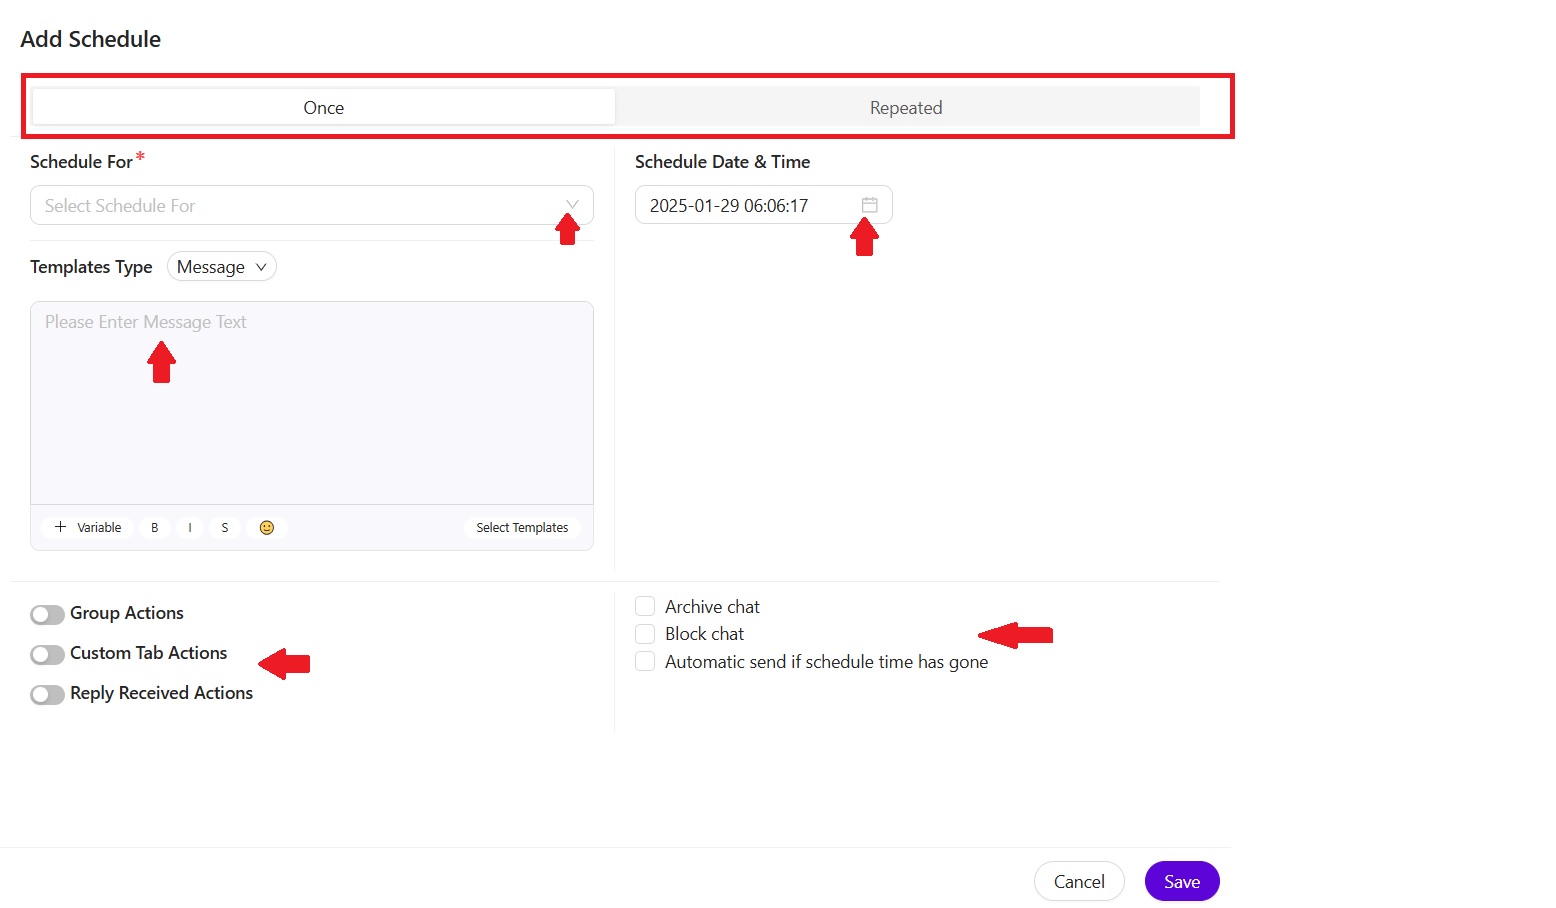
4. Scheduled Broadcasts:
- Select your audience:
- Choose your recipients by selecting contacts, groups, or specific tabs.
- Compose your message:
- Choose from existing templates or compose a new message.
- Customize your message with placeholders for personalized information.
- Schedule delivery:
- Set the date and time for your message to be sent.
- Review and submit:
- Preview your message and schedule.
- Click “Save” to confirm and schedule your broadcast.
5. Scheduled Notifications:
- Choose your notification type:
- Select whether you want a one-time notification or a recurring notification.
- Select your target:
- Choose your recipients by selecting contacts, groups, or specific tabs.
- Define notification parameters:
- Select a template type or compose a custom message.
- Choose the desired time and date for the notification to be delivered.
- Select actions:
- Choose the desired actions to be triggered by the notification, such as sending a reply or performing specific actions within the CRM.
- Review and schedule:
- Review all notification settings and schedule the notification to be delivered at the specified time.
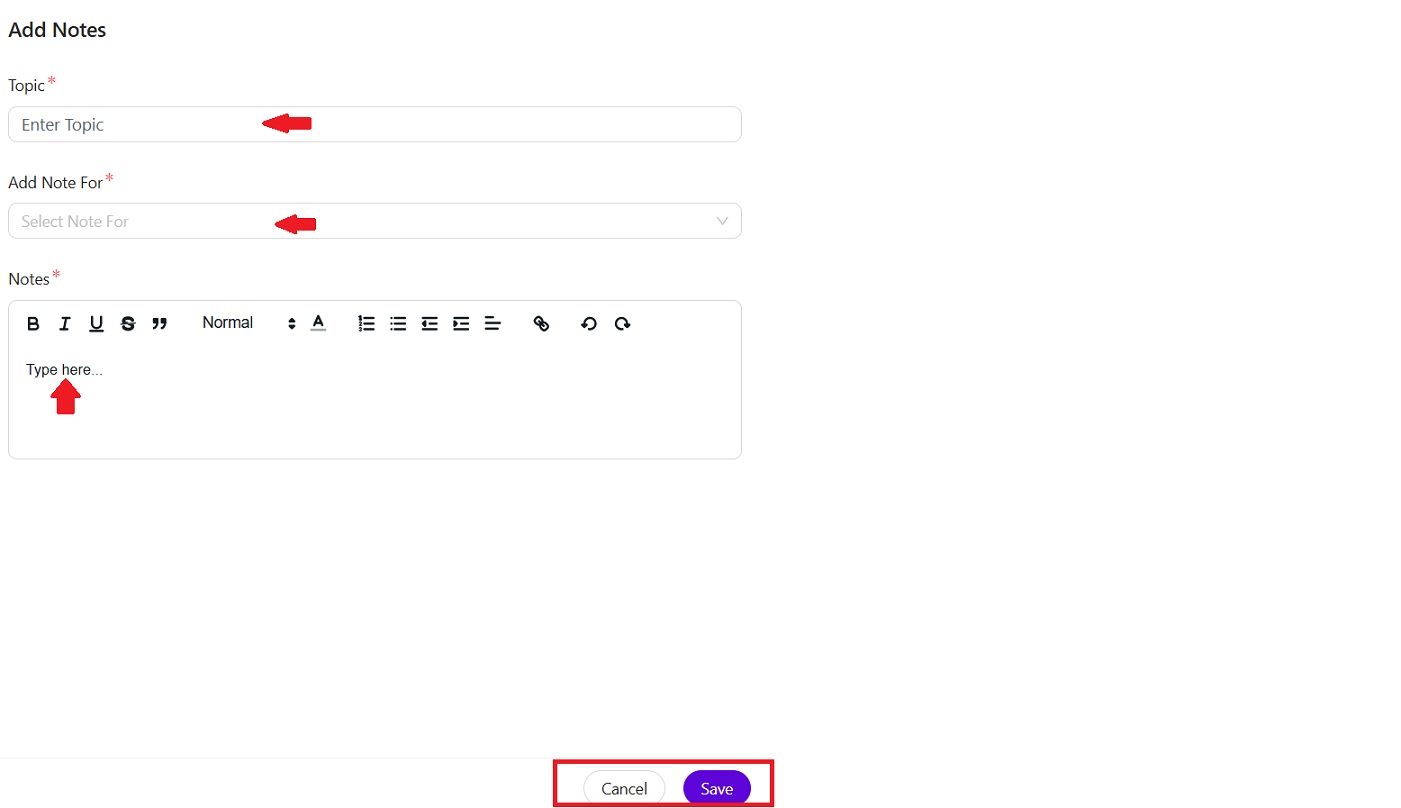
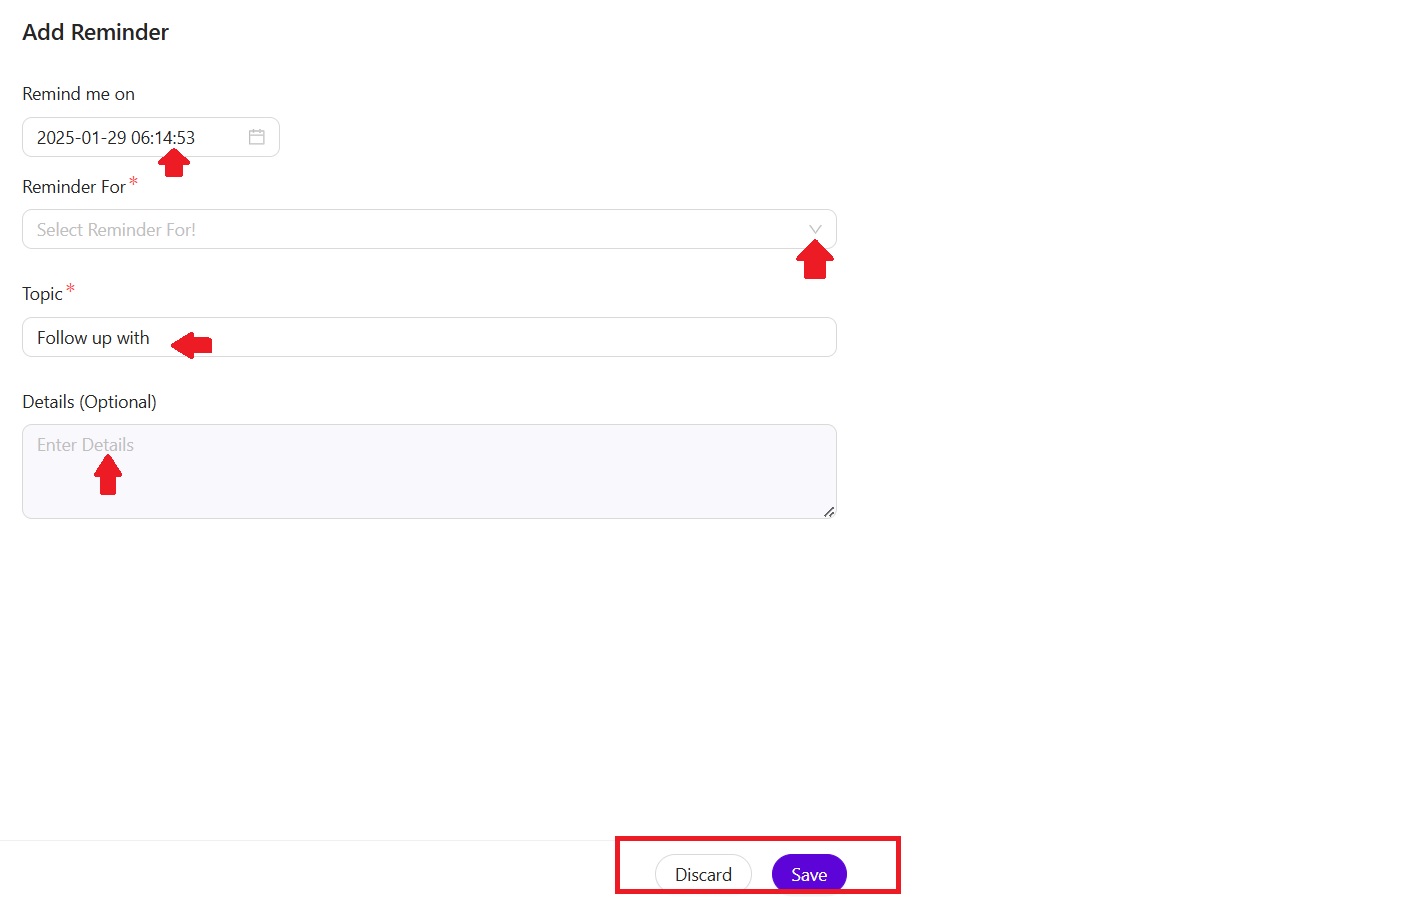
6. Notes & Reminders:
- Add notes to individual contacts to record important interactions.
- Set reminders within the CRM to follow up with specific clients.
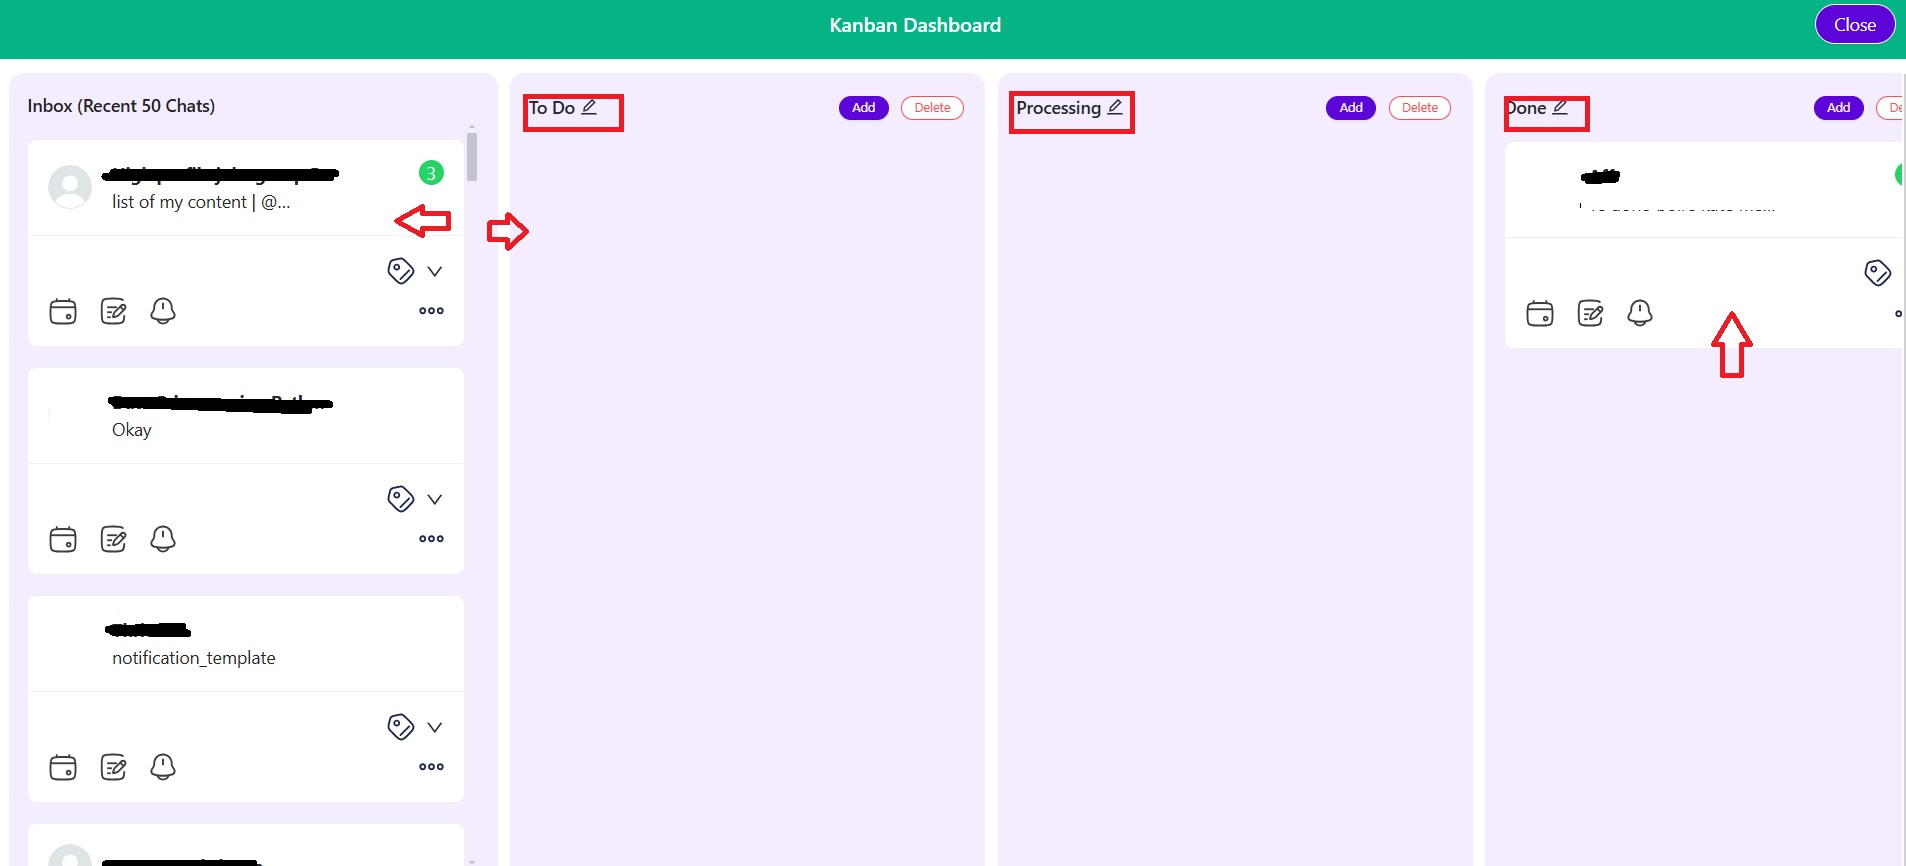
7. Kanban Boards:
- Organize your workflow:
- Visualize your sales pipeline with a Kanban board featuring stages like “To Do,” “Processing,” and “Done.”
- Manage contacts effectively:
- Add contacts to the board and easily move them between stages as they progress through the sales funnel.
- Flexible management:
- Drag and drop contacts between stages to update their status quickly and easily.
- Complete control:
- Add, delete, and edit contacts within the Kanban board as needed.
8. Functions-WhatsGenius CRM offers a suite of powerful functions to enhance your workflow and productivity:
- Contact Management:
- Import/Export Data: Easily import and export contact data for seamless integration with other systems.
- CRM Customization:
- CRM Custom Attributes: Create custom fields to track specific data points relevant to your business.
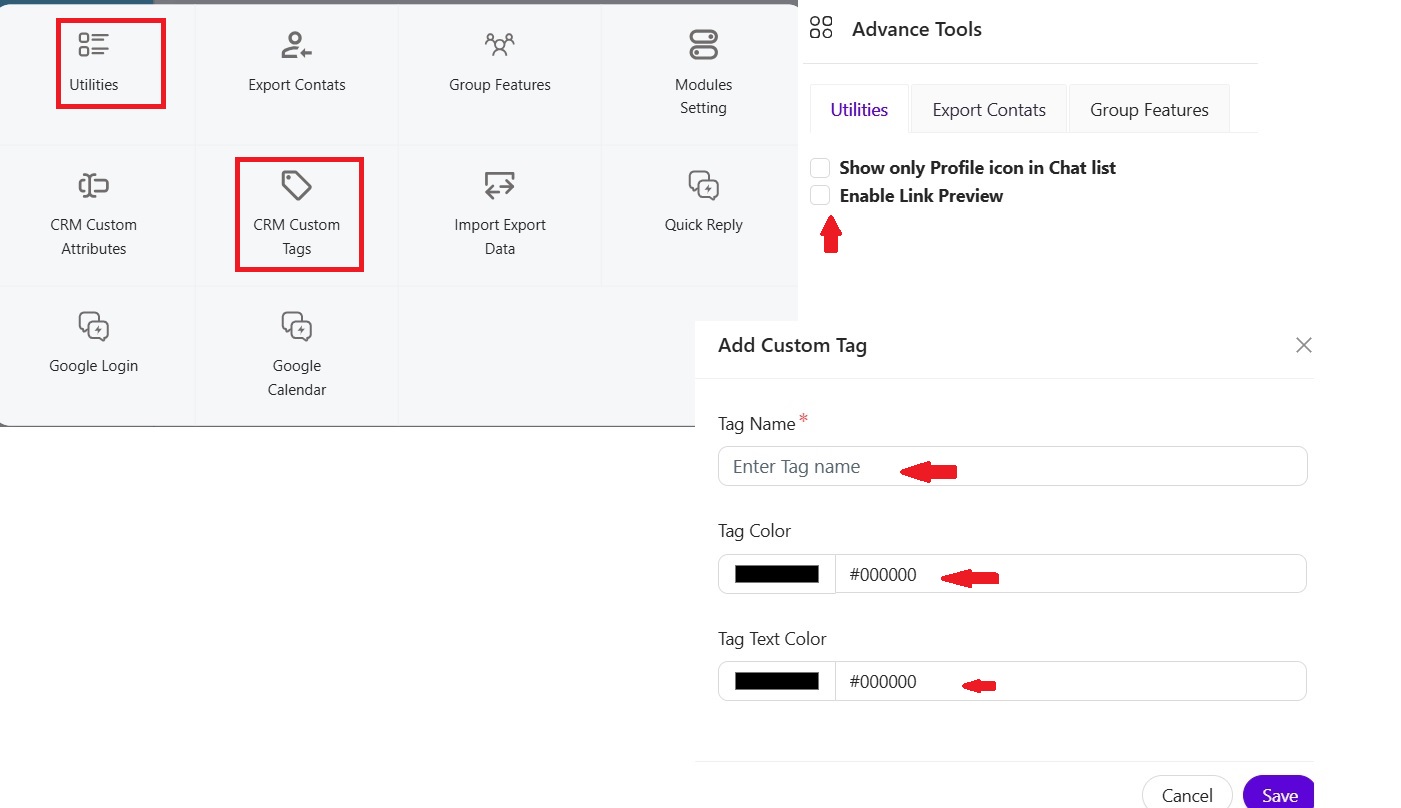
- CRM Custom Tags: Organize contacts with custom tags for better segmentation and filtering.
- Group Features:
- Create and manage groups of contacts for targeted communication and segmentation.
- Communication Enhancements:
- Quick Replies: Create and save pre-defined quick replies for faster and more efficient communication.
- Utilities:
- Access a range of helpful utilities to streamline your workflow, such as export contacts and other time-saving tools.
9. Tools-WhatsGenius CRM provides a suite of valuable tools to enhance your efficiency and streamline your workflow:
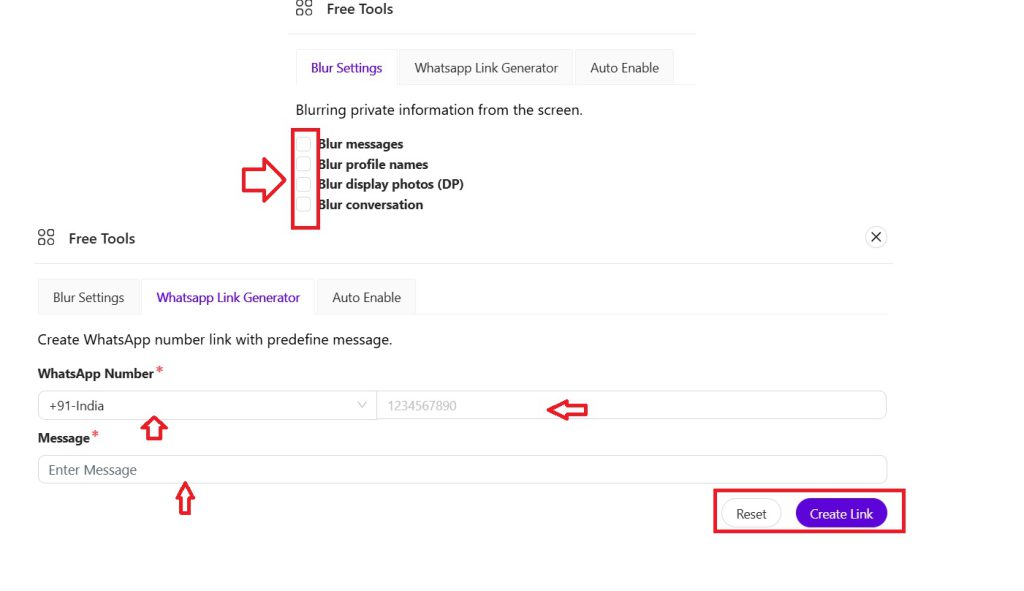
- WhatsApp Link Generator:
- Easily create shareable WhatsApp links for quick and convenient communication.
- Blur Settings:
- Control the visibility of sensitive information within the CRM to ensure data privacy and security.
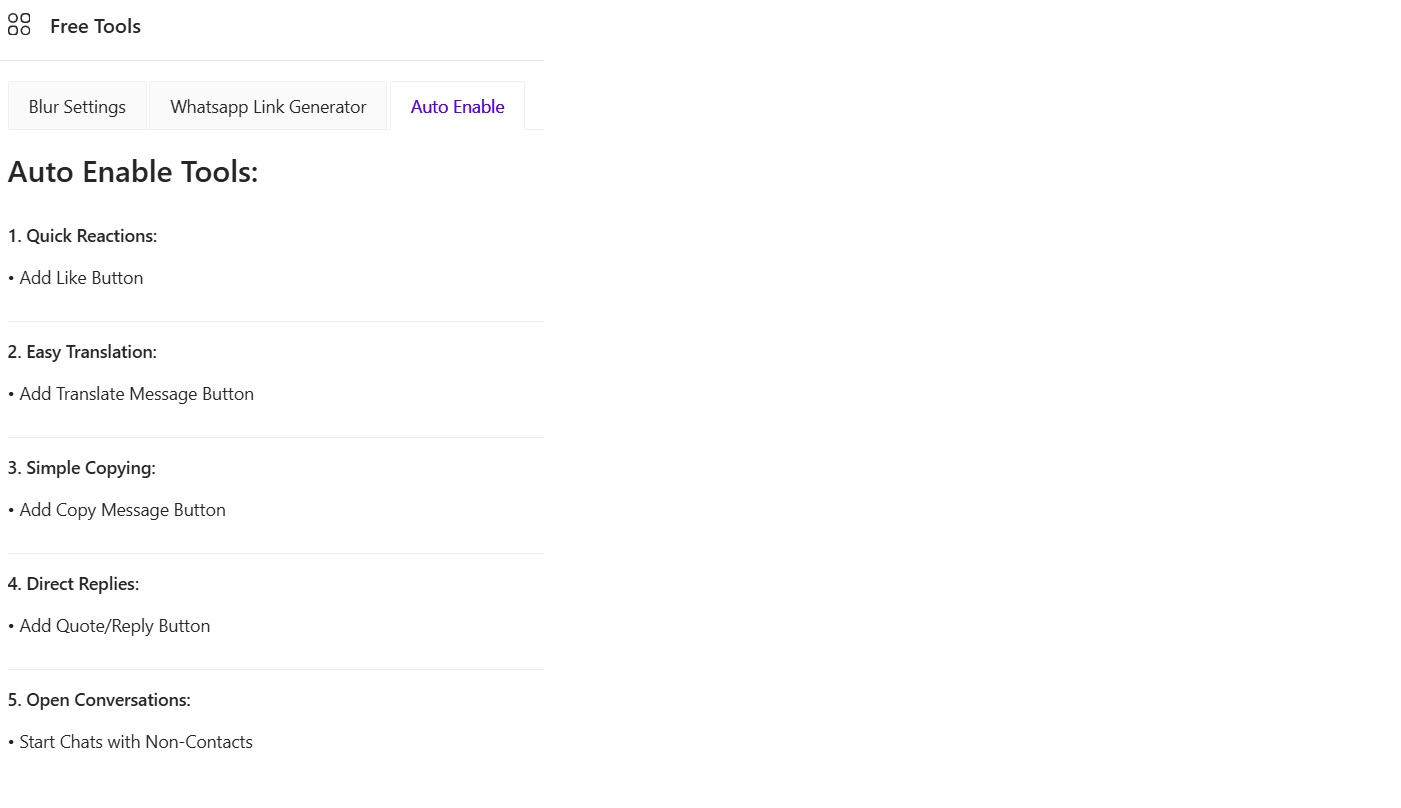
- Auto Enable:
- Automate specific actions within the CRM to save time and effort, such as:
- Quick Reactions: Automatically enable quick reactions to incoming messages.
- Direct Replies: Enable direct replies to messages for faster responses.
- Open Conversations: Automatically open conversations when new messages are received.
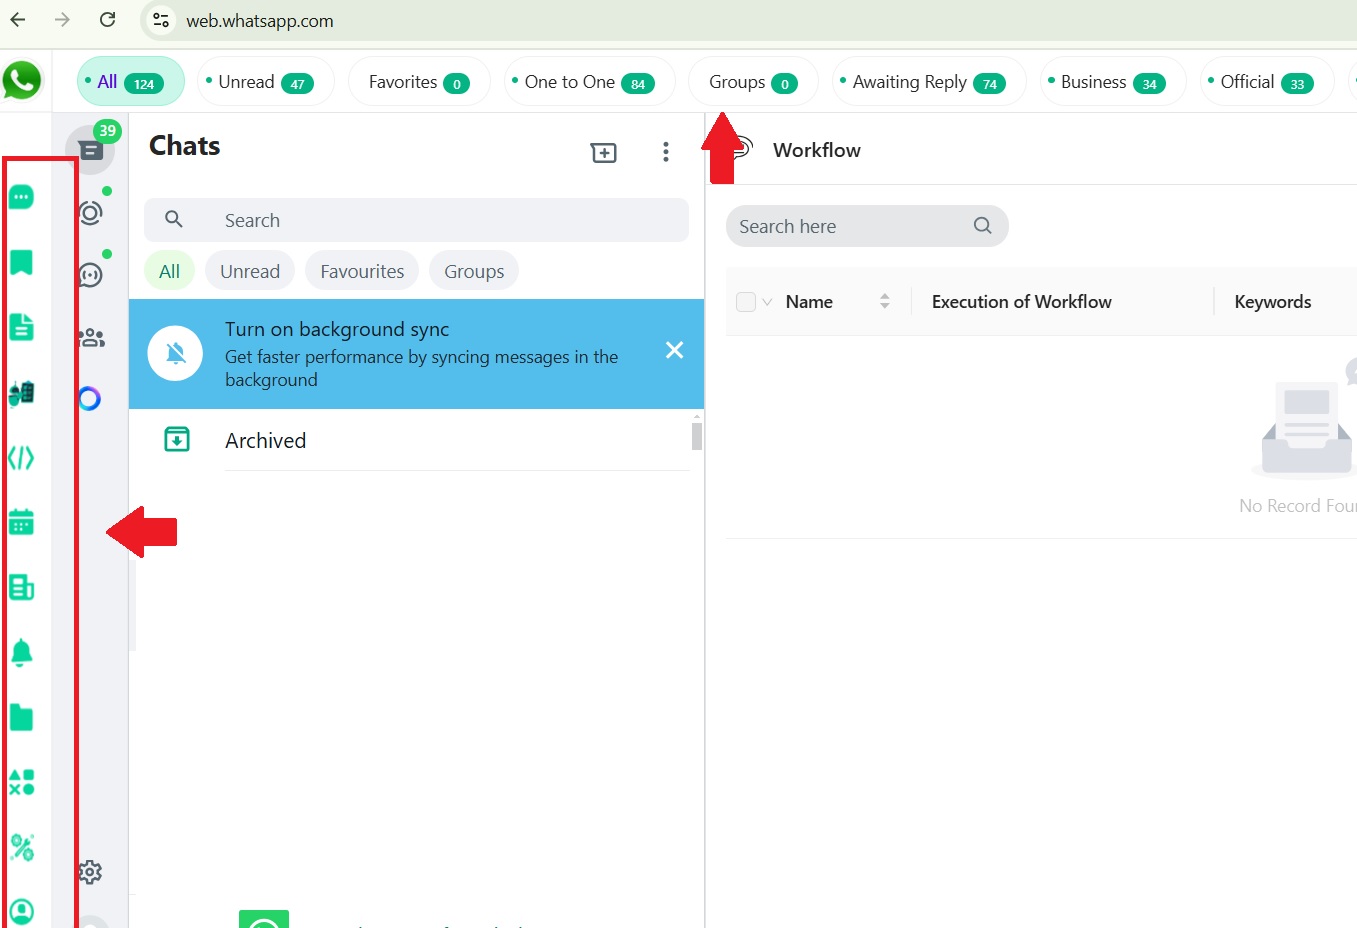
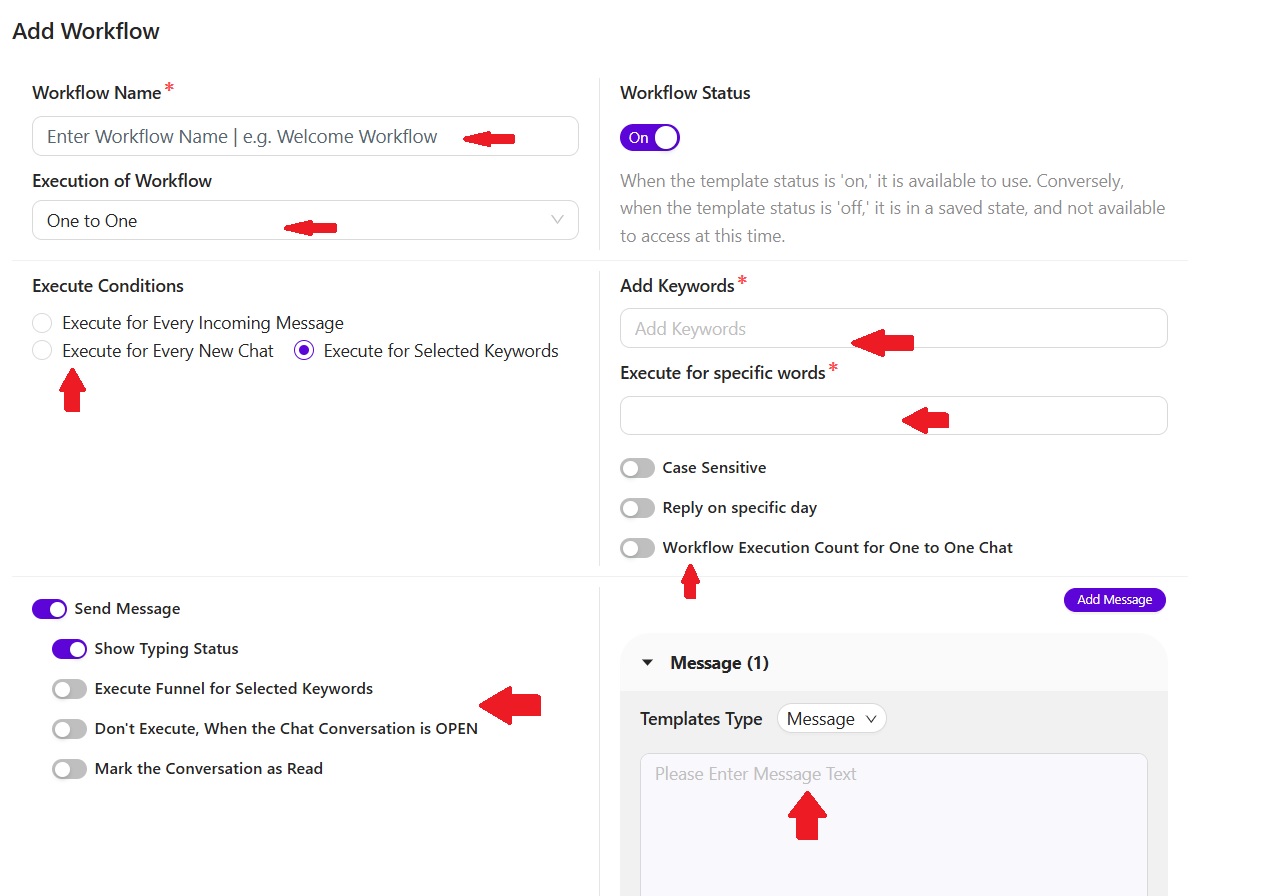
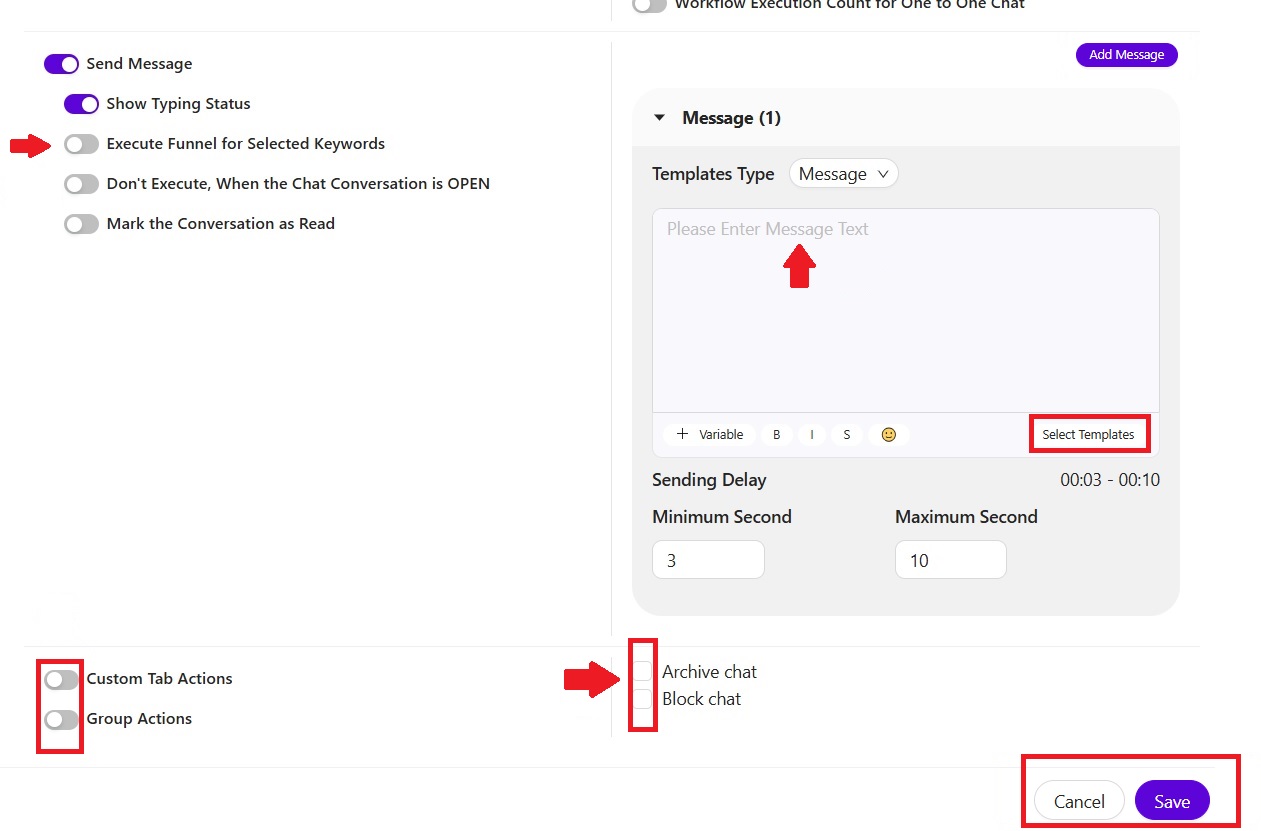
10. Chatbot Functionality-WhatsGenius CRM incorporates a powerful chatbot feature that allows you to automate interactions with your customers.
- Workflow Creation:
- Create Workflows: Design and configure automated workflows to handle customer inquiries and interactions.
- Define Workflow Name: Give your workflow a descriptive name for easy identification.
- Message Configuration:
- Choose Message Type: Select from pre-defined templates or compose custom messages.
- Message Content: Include text, images, documents, audio files, contact information, buttons, and even polls within your chatbot messages.
- Show Typing Status: Simulate human-like interaction by displaying a “typing…” indicator to customers.
- Set Delay: Control the delay between messages to create a more natural conversation flow (minimum and maximum delay times are configurable).
- Scheduling & Execution:
- Schedule Execution: Schedule your chatbot workflows to run at specific times or on specific days.
- Keyword Triggers: Configure the chatbot to respond to specific keywords or phrases within customer messages.
- Save & Manage:
- Save Workflow: Save your completed workflow for future use or modifications.
- Cancel Workflow: Stop an active workflow if needed.
Use the step-by-step guide to activate your CRM and enable all features. With this powerful chat bot capabilities, businesses can automate customer interactions, provide 24-7 support service for their customer, and provide superior customer satisfaction!

By applying the strategies and best practices discussed in this guide, businesses will be able to maximize the power of WhatsGenius CRM and improve their WhatsApp communications to help achieve business goals!! So, what are you waiting for, Get Started Now!
Download WhatsGenius CRM today and see how it can completely change the way you use WhatsApp for better communication.
If any queries arise, you can contact us through email at samdataservices(at)gmail.com or by filling out the contact form
Be First to Comment